In past posts (example, another, yet another) I’ve demonstrated using the CONCAT function to combine strings/fields. However CONCAT is limited to two arguments and I have often had to string multiple CONCATs together to accomplish a desired output. While the resulting expression looks kind of cool, it isn’t easy to write. I have just found a better way.
Instead of using the CONCAT function, you can just use the concatenation operator “||”. So to get an output like F23OTT (I), what would have been:
I have a post on PS Query Expressions and I was about to add a LISTAGG example to it. But I thought that instead I would create a new post just for LISTAGG examples since there may end up being many of them. The post Combine Multiple Rows and Fields explains LISTAGG.
FA award short description, status, and amount: LISTAGG(CONCAT(C.DESCRSHORT, CONCAT(‘ (‘,CONCAT(DECODE(B.AWARD_STATUS,’C’,’Cancelled’,’D’,’Declined’,’Accepted’), CONCAT(‘) ‘,B.DISBURSED_AMOUNT)))), ‘ – ‘) WITHIN GROUP (ORDER BY B.ITEM_TYPE)
UPPER(SUBSTR(A.EMAIL_ADDR,0,(INSTR(A.EMAIL_ADDR,’@’)-1))) I’m using this to join to the roll name on PSROLEUSER so I can then get the user’s actual name.
Expression for First Generation (C = ISIR_PARENT)
CASE WHEN (C.FATHER_GRADE_LVL IN (‘ ‘, ‘4’) AND C.MOTHER_GRADE_LVL IN (‘ ‘, ‘4’)) THEN ‘Unknown’ WHEN (C.FATHER_GRADE_LVL IS NULL AND C.MOTHER_GRADE_LVL IS NULL) THEN ‘Unknown’ WHEN (C.FATHER_GRADE_LVL = ‘3’ OR C.MOTHER_GRADE_LVL = ‘3’) THEN ‘No’ ELSE ‘Yes’ END
Decode, Substr, To_number and Least
CASE WHEN L.OFFER_BALANCE > 0 THEN 0 WHEN K.OFFER_BALANCE > 0 THEN DECODE(E.VARIABLE_CHAR4,’NO NEED’,LEAST(250,TO_NUMBER(SUBSTR(A.FLD1,12,5))), ‘HIGH’,LEAST(500,TO_NUMBER(SUBSTR(A.FLD1,12,5))), ‘MODERATE’,LEAST(500,TO_NUMBER(SUBSTR(A.FLD1,12,5))), ‘LOW’,LEAST(500,TO_NUMBER(SUBSTR(A.FLD1,12,5))), 0) ELSE DECODE(E.VARIABLE_CHAR4,’HIGH’,LEAST(1200,TO_NUMBER(SUBSTR(A.FLD1,12,5))), ‘MODERATE’,LEAST(1000,TO_NUMBER(SUBSTR(A.FLD1,12,5))), ‘LOW’,LEAST(750,TO_NUMBER(SUBSTR(A.FLD1,12,5))), ‘NO NEED’,LEAST(500,TO_NUMBER(SUBSTR(A.FLD1,12,5))), 0) END
Here is an interesting expression that uses a few different functions. If the student has already been awarded in this term (l.offer_balance > 0) then the result is 0. If the student has previously been awarded (k.offer_balance > 0), then a decode is used to evaluate the value in e.variable_char4. If there is no current or prior offer_balance then a different version of the decode statement is used. The decode works like this:
Look in this field
If this is the value
This is the result
DECODE
(E.VARIABLE_CHAR4,
‘HIGH’,
LEAST(1200….
LEAST(1200,TO_NUMBER(SUBSTR(A.FLD1,12,5))) The least statement returns whichever is lower, the number (ex. 1200) or the result of TO_NUMBER(SUBSTR(A.FLD1,12,5)). The substr statement is pulling 5 characters out of the field A.FLD1 starting at position 12. Then to_number converts that to a number for comparison in the least function.
MOD and FLOOR for a file extract
This is for an odd case where a file layout calls for no fractional digits on whole number amounts. ex. 123.45 = 123.45 : 678.00 = 678
CASE WHEN MOD(A.DISBURSED_BALANCE,1) > 0 THEN TO_CHAR(A.DISBURSED_BALANCE) ELSE TO_CHAR(FLOOR(A.DISBURSED_BALANCE)) END
Getting Calendar Year from Term Code
CONCAT(’20’,SUBSTR(C.EXP_GRAD_TERM,2,2))
Calculating age at time of application
MONTHS_BETWEEN(B.ADM_APPL_DT, H.BIRTHDATE) / 12
Removing non-number characters from phone number to compare ISIR phone number to Campus Community
Reformatting a 2020/11/06 date to 11/06/2020 TO_CHAR(TO_DATE(A.DT_APP_RECEIVED),’MM/DD/YYYY’)
Compare a date field to a date last year I.COMM_DT > TO_DATE(CONCAT(TO_NUMBER(:1)-1,’-02-01′),’YYYY-MM-DD’)
Get the date from a DateTime field TO_CHAR(CAST((A.COMM_DTTM) AS TIMESTAMP), ‘MM/DD/YY’) Also check out the EXTRACT function if you just need one element (day, month, etc).
String Theory CONCAT(SUBSTR(D.FLD4, 1, INSTR(D.FLD4, ‘ ‘)), ‘Meal Plan’) Using CONCAT, INSTR, and SUBSTR to turn the input string “Silver BOTH swipes & falcon dollars (custom)” to the output string “Silver Meal Plan”. CONCAT attaches two strings together. SUBSTR is used to extract just the beginning of the input string up to the first space (found by INSTR).
Posted in PS Query | Comments Off on PS Query Expressions
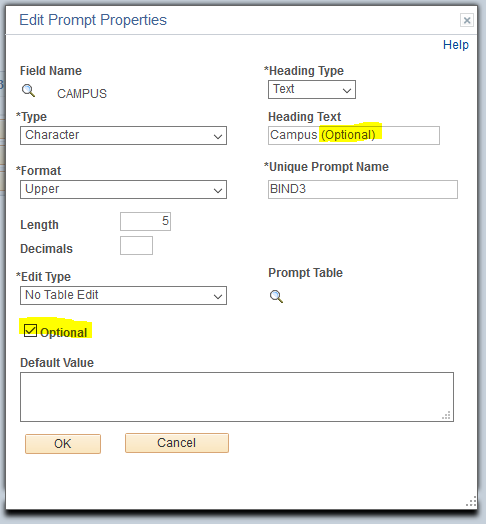
I add (Optional) to the heading so that the user knows they do not need to provide a value. There is also a checkbox to indicate that the prompt can be left blank.
Add the criteria for the target field as equal to the prompt as usual, but then also group it with another criteria with an OR statement allowing for the prompt to be Null.
Posted in PS Query | Comments Off on Optional Query Prompts
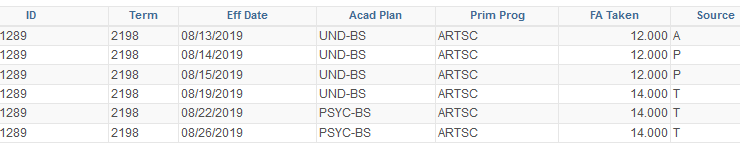
Sometimes you need to find which row of data in a table would have been the latest/greatest/current/effective row as-of a specified date or term. Describing this in plain language would be something like:
Show me the row with the latest date that is prior to August 17, 2019.
Or
Which row would have been in effect on August 17, 2019?
Here is some example data from the FA Term table:
So, given the question above, we would be looking for the 8/15/19 row. Of course FA term has delivered MAX Effective Date logic, but that isn’t helpful here and lots of other tables have dates that are not Effective Dates. Typically when you want to find the MAX date on a non-effective date table you just filter on the date and specify a criteria of equal to Subquery. Then in the subquery you Select the date field and use the Max Aggregate. But if you try to add a HAVING of Not Greater Than 8/17/19 it won’t return any results. If you try to add that same logic as a criteria at the top level you won’t get any results. So the way that I have found to do this is as follows:
Delete automatic effective date criteria if there is any.
At the top level of the query filter on the date field and set it Equal to Subquery.
In the subquery use the same record as the top level.
Specify whichever criteria are needed to limit the selection the the correct group (ID, Term, ect.)
Include a criteria on the date (or term) field such as Not Greater Than and specify a constant, a prompt, or another field.
Create an expression in the subquery that is the same type and length as the field you are filtering at the top level (ex. date, term).
Select the Aggregate Function checkbox.
The Expression Text will be “MAX(field)” where field is the field in the subquery record that mirrors the field being filtered at the top level. So for this example it would be “MAX(B.EFFDT)”.
Select “Use as Field” for this expression.
The query should now return just the row of data that you are looking for. Looking at the SQL generated by the initial attempt using the standard Select MAX and the revised query using an expression, the only difference is the final (outer) right parenthesis on the A.EFFDT subquery moves down one line to also encompass the Not Greater Than criteria.
I am 100% sure there are other ways to accomplish this. I’m pretty sure that I had gotten this to work in the past using another method. But this is what I got to work now and I wanted to document it for the future (and others).
All the best. I hope this helps someone.
Cheers, John @ BGSU
Update: If looking for the effective dated row just prior to the Max effective row try this from Michael K. on HEUG.
To get the second highest effective date, add another copy of the same table to the query (this one would be labeled as B) it will auto add the same effective date and effective sequence criteria. Go to update the B.EFFDT criteria to be EFFDT < (not just < ) A.EFFDT. If done right when looking at the sql it should have the max criteria just like the one above but instead of being < SYSDATE it’ll be < A.EFFDT[.
Posted in PS Query | Comments Off on Max, Yet Prior To
This post is going to be a super high-level overview of how to do conditional text in a COMGEN e-mail template. Admittedly I am mostly writing this for myself as a reference for the next time I go to do one of these. I am likely the most regular visitor to this blog as I try to remember exactly how I’ve done things in the past.
What is needed
All the usual setup for a communication (letter code, context, category, etc)
A query that will pull the data you want used in the communication and to check for the conditional text areas
A Communication Data Source
The BI Publisher Design Helper to create the template
A template to use with the Report Definition
A Report Definition
Left-Outer Expression Trickery
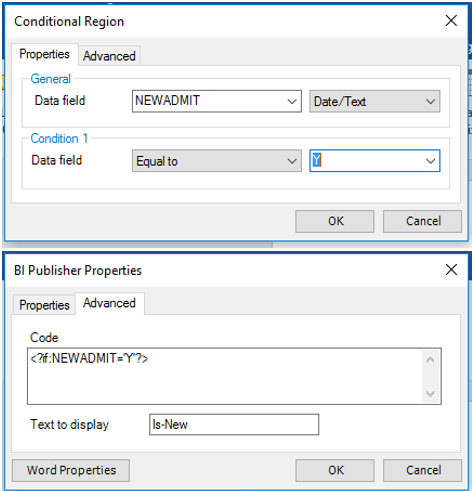
We want this communication to say one thing if the student has a campus e-mail address (exists) and something else if they do not (not exist). So we are passing in a flag in a field to indicate this. To accomplish this we are doing a left-outer join to the e-mail address table, then setup an expression to output a “Y” if they have an address and a “N” if they do not. Here is what that expression looks like:
Click the “Use as Field” link to add this to the output fields then click “Edit” on the Fields tab and give it a user friendly name in the Unique Field Name box.
Query Prompts
In order to use any query with a BI Publisher Data Source it needs to include the correct prompts. This is how the BI Publisher process passes values to the query to pull the correct data. This is described in the PeopleBooks article “Setting Up the Communication Generation Process” if you need more details than what I’ll put here.
All additional data queries must include a prompt for Person ID or Org ID. Other prompts will depend on which Admin Function your communication is for. I am using FINA, and since the variable data required for FINA is Aid Year, I have to include a prompt for Aid Year. To do this, you create prompts in the query and change the “*Unique Prompt Name” in the prompt properties. For Person ID it has to be exactly “PERSON_ID” and for Aid Year it is “AID_YEAR”. Put any additional criteria in the query and select any fields that you will want to output or use as criteria in the conditional text checks.
Add the Query to the Data Source
The data source for this communication (BI Publisher Report Definition) will need to be an XMLDoc Object, which means you’ll need to create it from Main Menu > Campus Community > Communications > Set up Communications > Communication Data Source. Select your Administrative Function and in the Custom Extract Data section select PS Query and enter the name of your query. Register the data source, then click the “View/Download Sample Data File” link and save the XML file for use in creating the template.
Creating the Template
If you haven’t already, install the Design Helper found at Main Menu > Reporting Tools > BI Publisher > Setup.
Then open MS Word and hopefully you have a BI Publisher menu tab at the top. Click the “Sample XML” button and open the XML file saved from the Data Source screen. Now start typing the body of your e-mail.
Dynamic Values from Query
To insert a value from the query, select the “Field” button. WARNING: Don’t click the “All Fields” button! It will add all available fields from your XML file to the template, it’s a mess and it takes a while. The Field box that opens up will contain the fields available to insert. Some fields are there with any data source, some a specific to your admin function, and at the bottom will be the fields from your query. Select the field and click Insert.
Conditional Text Areas
To setup areas on the template that will output different text depending on values in the data source, you will use the Conditional Region button. Position your cursor where you want the conditional text and click the Conditional Region button. In the Data field drop down select the field you want to check, specify Number or Date/Text, select an operator (=, >, <), then specify a constant or field to compare against. Then click the Advanced tab. You will see that it has built the Code for you. Now enter some text to display, otherwise it will just show the letter “C” and if you have multiple conditional areas it will get confusing.
Here is an example where I want to output a sentence if the student is a new admit:
The template will now have two blocks with grey backgrounds, Is-New and EC. The EC is for End Conditional (region). Any text and/or dynamic fields between those blocks will only be output if the condition is met.
Once you are done with the template, save it and upload it to the Report Definition. The preview from there isn’t very helpful with dynamic data and the conditional regions. I found the best way to test is to assign the communication to a group that will represent the possible combinations for the conditions then use the “Online Preview” within COMGEN to have the emails generated and sent to you.
Good Luck!
Posted in PeopleSoft, PS Query | Comments Off on Conditional Text in COMGEN E-mails
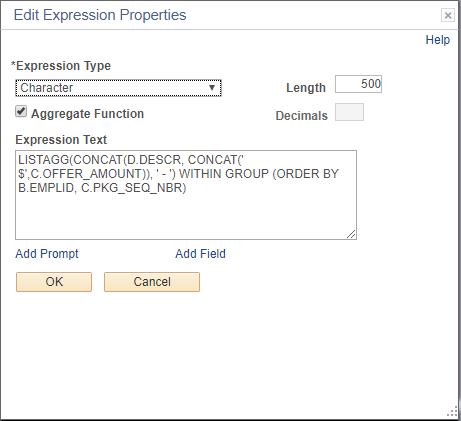
Use LISTAGG(CONCAT(D.DESCR, CONCAT(‘ $’,C.OFFER_AMOUNT)), ‘ – ‘) WITHIN GROUP (ORDER BY B.EMPLID, C.PKG_SEQ_NBR)
To make this:
Student
Term
Award
Amount
A. Person
Fall 18
BG Scholarship
1000
A. Person
Fall 18
Federal Grant
2000
A. Person
Fall 18
Federal Loan
3500
B. Clever
Fall 18
BG Scholarship
1000
B. Clever
Fall 18
Outside Scholarship
2500
Look like this:
Student
Term
Awards
A. Person
Fall 18
BG Scholarship $1000 – Federal Grant $2000 – Federal Loan $3500
B. Clever
Fall 18
BG Scholarship $1000 – Outside Scholarship $2500
The Details
The LISTAGG function can be used in an expression to combine multiple rows of data. The field(s) in the LISTAGG are grouped and then ordered by student. A more simple version would be:
LISTAGG(D.DESCR, ‘ – ‘) WITHIN GROUP (ORDER BY B.EMPLID)
This would give you a field with all of the awards separated by a space, dash, and space. “Scholarship – Grant – Loan”
You can combine the LISTAGG function with the CONCAT function to combine multiple fields (Description and Amount) and/or fields and strings (Amount and “$”).
You can also specify multiple fields in the ORDER BY to sort on more than one field. In the top example it is sorting by student and then within the student sorting the awards in the order they appear on the Assign Awards to a Student screen.
LISTAGG is (hopefully obviously) an aggregate function, so be sure to check the Aggregate Function checkbox on the “Edit Expression Properties” box and specify a length that will be enough to accommodate everything after combining.
I hope you find this useful. I think it’s really cool and makes for some much nicer looking output.
This is just a public service announcement to save network traffic and file storage space.
When you run a query to Excel from PeopleSoft it will initially be in an Excel 2010 .xls file format. The query results that I just download had 39,181 rows and 10 columns of data. As an xls file it had a file size of 6,733 KB. Without making any other changes I saved the file as an Excel 2013 .xlsx file and it reduced the file size to 1,756 KB. That is almost 75% smaller.
Thank you for your attention. You may now return to your memes and cat videos.
Disclaimer: This may only apply to Oracle databases.
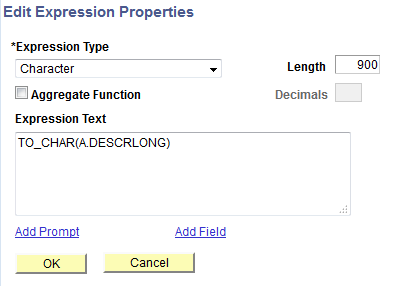
I think my favorite PeopleSoft Query error occurs when you are outputting a CLOB field and try to use an aggregate or DISTINCT.
inconsistent datatypes: expected – got CLOB
The messages always makes me think, “Got Milk?” The two fields that I seem to run into this the most often with are 3C comments and checklist item Long Description. In PS Query the fields show as “Text” format, but behind the scenes the content is stored in what is called a CLOB field. You don’t really need to know the details about how CLOBs are stored in the database, you just need to know when it’s a problem with PS Query and what to do about it.
It seems that you can output a CLOB (Text) field in PS Query just fine. However, if you mark your query as distinct or make any fields an aggregate (count/sum/etc), you will get the above error message. The workaround is to create a “Character” type expression, use the TO_CHAR function, and specify a length. Our checklist item descriptions can be pretty long, so I’ve used a length of 900 in the example below. You then use your expression as a field instead of the CLOB field from the record. I hope this helps and maybe solves the mystery of the weird CLOB error. – Cheers, John
Posted in PS Query | Comments Off on Query get CLOBed?
A colleague just taught me how to left-outer-join (LOJ) an effective dated table in PeopleSoft Query. In the past I would only be able to LOJ non-effective dated tables or use views that had the effective date logic built in. I just looked through my old posts and it doesn’t look like I’ve posted about LOJs before. So I’ll give a quick rundown of why you would want to use one.
Example
Say you have three different tables for First, Middle, and Last names. If you just standard joins you will only see results for those records that are present in all three tables. But what about my dad? My dad doesn’t have a middle name. Weird, I know. Here is some sample data.
First Name
UID
First
1001
John
1002
Larry
1003
Joanne
Middle Name
UID
Middle
1001
Isa
1002
The
Last Name
UID
Last
1001
Coolguy
1002
Cat
1003
Rowling
So using standard joins and connecting these tables on UID, you would get:
1 John Isa Coolguy
2 Larry The Cat
What about Joanne? That’s right, JK Rowling also has no middle name. She gets left out because of the standard join. However, using a left-outer-join would allow you to make sure that she and any others were not left off. And that output would look like this:
1001 John Isa Coolguy
1002 Larry The Cat
1003 Joanne Rowling
Cool, but how?
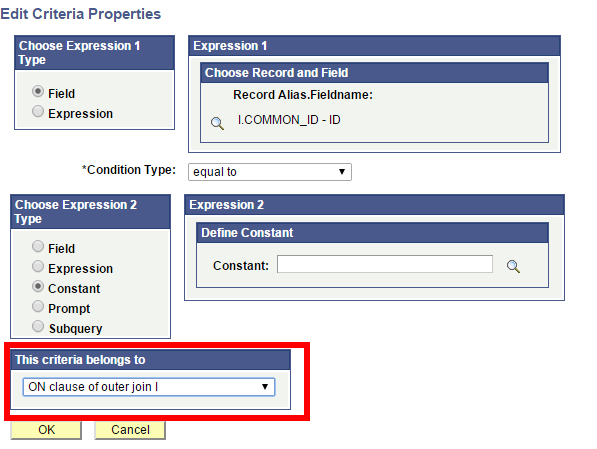
In PeopleSoft Query, when you go to join a record you will get a “Join Type” box. Typically you would select Standard Join “Join to filter and get additional fields. To do an LOJ, you would select the other option “Join to get additional fields only” (Left outer join). An important thing to remember is that if you need to put any criteria on the LOJed table, you need to specify that the criteria belongs to the ON clause of the outer join in the Edit Criteria Properties box.
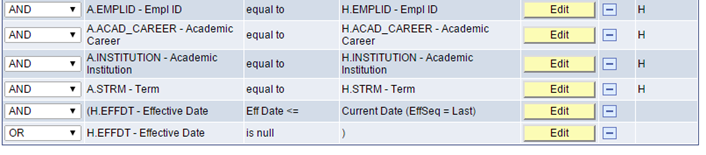
So that is how to do a normal LOJ, which I was already comfortable with. The extra complication is with effective dated tables. Those tables come with special criteria which is also a subquery. It isn’t as simple as saying that criteria “belongs” to the left outer join like any other regular criteria. The magic to make this work is to leave that effective date criteria but then to manually add an additional criteria for the effective date and set the condition type to “is null”. Then change the logical setting from AND to OR and group those two lines with parenthesis. As such…
I can only assume that I’ve made your life 1,000% better. Well, we both have Jeff M. to thank. He’s the one that taught it to me. Let me know in the comments if you have any questions about how to make this work.
Cheers.
-John
Posted in PS Query | Comments Off on Left Outer Joining Effective Dated Tables