Conditional Text in COMGEN E-mails
Posted by jeggent on November 26, 2018
This post is going to be a super high-level overview of how to do conditional text in a COMGEN e-mail template. Admittedly I am mostly writing this for myself as a reference for the next time I go to do one of these. I am likely the most regular visitor to this blog as I try to remember exactly how I’ve done things in the past.
What is needed
- All the usual setup for a communication (letter code, context, category, etc)
- A query that will pull the data you want used in the communication and to check for the conditional text areas
- A Communication Data Source
- The BI Publisher Design Helper to create the template
- A template to use with the Report Definition
- A Report Definition
Left-Outer Expression Trickery
We want this communication to say one thing if the student has a campus e-mail address (exists) and something else if they do not (not exist). So we are passing in a flag in a field to indicate this. To accomplish this we are doing a left-outer join to the e-mail address table, then setup an expression to output a “Y” if they have an address and a “N” if they do not. Here is what that expression looks like:

Click the “Use as Field” link to add this to the output fields then click “Edit” on the Fields tab and give it a user friendly name in the Unique Field Name box.
Query Prompts
In order to use any query with a BI Publisher Data Source it needs to include the correct prompts. This is how the BI Publisher process passes values to the query to pull the correct data. This is described in the PeopleBooks article “Setting Up the Communication Generation Process” if you need more details than what I’ll put here.
All additional data queries must include a prompt for Person ID or Org ID. Other prompts will depend on which Admin Function your communication is for. I am using FINA, and since the variable data required for FINA is Aid Year, I have to include a prompt for Aid Year. To do this, you create prompts in the query and change the “*Unique Prompt Name” in the prompt properties. For Person ID it has to be exactly “PERSON_ID” and for Aid Year it is “AID_YEAR”. Put any additional criteria in the query and select any fields that you will want to output or use as criteria in the conditional text checks.
Add the Query to the Data Source
The data source for this communication (BI Publisher Report Definition) will need to be an XMLDoc Object, which means you’ll need to create it from Main Menu > Campus Community > Communications > Set up Communications > Communication Data Source. Select your Administrative Function and in the Custom Extract Data section select PS Query and enter the name of your query. Register the data source, then click the “View/Download Sample Data File” link and save the XML file for use in creating the template.
Creating the Template
If you haven’t already, install the Design Helper found at Main Menu > Reporting Tools > BI Publisher > Setup.
Then open MS Word and hopefully you have a BI Publisher menu tab at the top. Click the “Sample XML” button and open the XML file saved from the Data Source screen. Now start typing the body of your e-mail.
Dynamic Values from Query
To insert a value from the query, select the “Field” button. WARNING: Don’t click the “All Fields” button! It will add all available fields from your XML file to the template, it’s a mess and it takes a while. The Field box that opens up will contain the fields available to insert. Some fields are there with any data source, some a specific to your admin function, and at the bottom will be the fields from your query. Select the field and click Insert.
Conditional Text Areas
To setup areas on the template that will output different text depending on values in the data source, you will use the Conditional Region button. Position your cursor where you want the conditional text and click the Conditional Region button. In the Data field drop down select the field you want to check, specify Number or Date/Text, select an operator (=, >, <), then specify a constant or field to compare against. Then click the Advanced tab. You will see that it has built the Code for you. Now enter some text to display, otherwise it will just show the letter “C” and if you have multiple conditional areas it will get confusing.
Here is an example where I want to output a sentence if the student is a new admit:
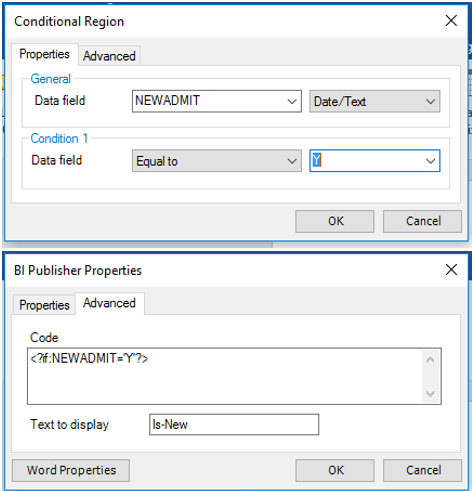
The template will now have two blocks with grey backgrounds, Is-New and EC. The EC is for End Conditional (region). Any text and/or dynamic fields between those blocks will only be output if the condition is met.
Once you are done with the template, save it and upload it to the Report Definition. The preview from there isn’t very helpful with dynamic data and the conditional regions. I found the best way to test is to assign the communication to a group that will represent the possible combinations for the conditions then use the “Online Preview” within COMGEN to have the emails generated and sent to you.
Good Luck!