Geeks on Campus

Another amazing bgsu blog

Archive for the 'PS Query' Category

Unionize your queries

Posted by jeggent on 24th July 2013

I’ve been meaning to write a blog post about unions in PS query for some time now, but I didn’t have a good example to work with until today.  So the scenario is that you want to list out all of the items from record (table) A and the count of their occurrences in record B.  As long as each entry in record A has at least one match in record B that’s fine.  You would just use a standard join and put the COUNT aggregate on a field in record B.  But what to do when there are no matching rows in record B and you don’t want to lose any items from A?

The first idea is to just use a left outer join from A to B and count a field in B.  That works mostly fine except you will get a count of 1 for items that have no rows in record B.  To mitigate the confusion this would cause you can output an additional field from the B record.  That way the additional field from B will only display with the items that have at least one row in B and the others with a count of 1 you will know are really 0.  Given the example of counting the occurrences in STDNT_AWARDS (B) of the item types in ITEM_TYPE_FA (A):

Item    Descr          Count   Year
1234   Pell Grant   1,234   2014
2345  ABC Grant            1
3456  Fed Loan     2,345  2014

You can see that no details from the A  record are lost and the “ABC Grant” has no matching B rows because the year field is blank.

Or you could use a Union

I think a cleaner solution would be to use a Union.  You would create the query first using a standard join and count.  That would result in output such as:

Item    Descr          Count
1234   Pell Grant   1,234
3456  Fed Loan     2,345

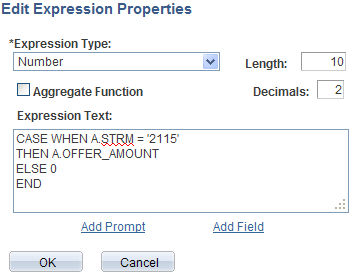
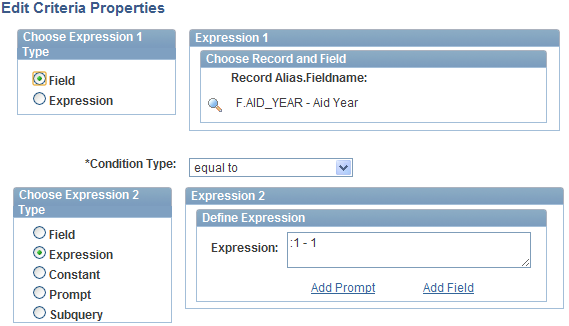
Then you would add a Union to the query.  This is done using the “New Union” link at the bottom of the Query Manager page (left of the Return to Search button).  It will look like a new query has been started, but it will say “Working on selection Union 1” at the top.  Select your A record and choose the same fields in the same order as the original query.  * An important point is that the union must have the same number of fields of the same type and in the same order as the main query or you will get an error *  Then create an Expression with a type of number and in the Expression Text box just enter the number 0.  Use this Expression as a field.  Finally add a Does not Exist subquery to the union to only select A rows that have no match in the B record.  Then your output will look like this:

Item    Descr          Count
1234   Pell Grant   1,234
2345  ABC Grant            0
3456  Fed Loan     2,345

*Note that the query will use the field names and sorting specified in the Top Level Query.

That should do it.  Hopefully knowing how to use Unions in PS Query will help you write better queries.

*Update* Do note that adding a Union to your query has the effect of checking the “Distinct” box, you won’t get duplicate output.

Posted in PeopleSoft, PS Query | Comments Off on Unionize your queries

Cool Running Totals

Posted by jeggent on 5th April 2013

This may be old news to some of you geeks, but I’m pretty excited to figure out how to do running totals in PeopleSoft Query. And, it’s actually pretty easy! In the following example I’m listing Federal Pell Grant disbursements for the aid year with a running total. The first step is to build your query as normal, select the fields you’d like on the output and filter on whatever criteria is correct.  For this example I’ve selected one item type and one aid year.  Next, select the Expressions tab and click on Add Expression. Don’t forget to check the Aggregate Function check box. Here is my expression:

You can see that you are using the SUM function with the field you want the running total for. Then after OVER specify your ORDER BY fields as you would in any other aggregate. Click OK then the Use as Field link to include it in your output. Your output should looks something like this:

ID # Pell $ Running Total
00005 $5,550 $5,550
00009 $2,200 $7,750
00014 $3,100 $10,850

Hopefully you can make good use of running totals in your queries.

Good Luck.

Posted in PS Query | Comments Off on Cool Running Totals

Excel + PS Query = Search Match

Posted by jeggent on 24th August 2012

I’m working on a project to (pop) update a field in PeopleSoft based on a file from an outside source.  The goofy part is that the file does not have a student ID (not surprising), and the first 5 characters of the SSN are masked (more surprising).  So then how do I do a one-to-one match in order to do the update?  What I’ve come up with had a couple of Excel and PS Query tips that I thought were worth sharing.  The first thing I did was create some new columns in the Excel file that is the source data.  To get just the 4 “good” characters of the SSN, I used the RIGHT function.

Equation:  =RIGHT(B4,4)
Translation:  Give me the last 4 characters from the string (text) in cell B4
Example:  ***-**-1234  = 1234

The name in the source data is listed in this format, Last (comma) (space) first (space) middle initial.  To get just the last name from that string I first used the FIND function to get which character position the “,” is in.

Equation:  =FIND(“,”,C4,1)
Translation:  This looks weird because it is a comma that I’m looking for.  The syntax is FIND then what you are looking for in quotes, what cell to look in, and what character position to start looking from.  So this equation says find the comma in cell C4 and start looking at the first character.
Example:  Student, John A = 8  (the comma is the 8th character in the string (name))

Then I use the LEFT function to get the last name.

Equation:  =LEFT(C4,G4-1)
Translation:  In this example G4 has the results of the Find function.  So this says give me the beginning (Left) characters of the string in cell C4 and stop one character before the number G4 (G4 -1).
Example:  G4 = 8 (see above)  Student, John A = Student (left 7 (8-1) characters in the name)

Next I wanted to use the first three characters in the first name.  I only wanted the first three because of the variability of how first names are recorded.  I used the MID function for this.

Equation:  =MID(C4,G4+2,3)
Translation:   MID is like LEFT and RIGHT except it lets you specify a starting point and an ending point.  This equations says: starting two characters after the comma (remember G4 holds the position of the comma and a space follows the comma, G4+2) give me the next three characters.
Example:  G4 = 8  Student, John A = Joh (three characters starting after the comma and the space)

So, those are fields that I am going to match on in PeopleSoft; the last four of the SSN, the last name, and the first three letters of the first name.

We (thankfully) have a process that allows us to upload a file to PeopleSoft to use in a query.  I uploaded this input file and used some criteria with expressions to do the matching from the file to the PEOPLE_SRCH record to get the student ID.  The last name field is a simple EQUAL TO criteria then I compare the last four of the SSN in the input file to the expression SUBSTR(B.NATIONAL_ID,-4).  The function SUBSTR typically works like the LEFT function in Excel where you specify a field and a number to get the first given number of characters in that text.  However (HOT TIP) if you use a negative number, as I did, it will work like the RIGHT function in Excel and give you the last given number of characters in that text.

For the first name comparison I used the expression SUBSTR(B.FIRST_NAME_SRCH,1,3).  When used with two number parameters SUBSTR works like Excel’s MID, so this expression gets the first (because the first number parameter is 1) three characters of the first name.

I double checked the results and using these three criteria I am able to get the student ID for those in the input file.  While you may never have this same exact situation, hopefully you’ll find parts of this post useful in other projects.

Cheers,
John

Posted in Excel, PeopleSoft, PS Query | Comments Off on Excel + PS Query = Search Match

SUM for Fewer Rows

Posted by jeggent on 21st July 2011

You likely already know that you can use an Aggregate like SUM to reduce multiple query results rows to a single row.  But did you ever think about using it with a couple of functions to display multiple values in a single row?

Examples

A simple example of a SUM to reduce rows, would be summing the offer amounts of all of a student’s awards to display their total offers.

A more advanced example using SUM with functions would be to display the Summer, Fall, and Spring semester amounts on a single row.  For this example I will be using the STNDT_DISB_AWD record.  For you non-Financial Aid people I will clarify that in this record the award amounts are listed by term, so without any aggregate function the amounts would be shown on separate rows.  The next step will be to create three functions, one for each term:

*note: ‘2115’, ‘2118’, and ‘2122’ are our terms for Summer, Fall, and Spring

Use those functions as fields and select the SUM aggregate for them.

Without the functions and aggregate the data could have looked like this:

EMPLID             TERM    OFFER
0012345678   2115      1000.00
0012345678   2118      2000.00
0012345678   2122      2000.00

With the functions and aggregates the data could look like this:

EMPLID             Summer Offer   Fall Offer   Spring Offer
0012345678    1000.00             2000.00     2000.00

I hope you find this useful.

John

Posted in PeopleSoft, PS Query | Comments Off on SUM for Fewer Rows

PS Query – Decode Function

Posted by jeggent on 12th July 2011

As expected, the previous semester was very busy.  The next semester will likely be even busier.  However it will also be my last semester.  Assuming I am able to complete the two classes, I will graduate this December.

Today I have used the DECODE function for the first time in a PeopleSoft query.  I am not sure which databases this function works with, we are on an Oracle DB.  Decode allows you to display a specific value based on the contents of a field.  For example, if a field contained integers you could output the corresponding letter of the alphabet.  The syntax of the function is like:

DECODE(Field, Value 1, Output 1, Value 2, Output 2, Else)

Alphabet example:

DECODE(A.Field, 1, ‘A’, 2, ‘B’, 3, ‘C’, 4, ‘D’, …., 36, ‘Z’, ‘other’)

I am using this function in a report for repackaging aid.  I am “decoding” the currently packaged item type to the item type it needs to be replaced with.  If there are multiple values that translate to the same output then you may want to consider a CASE statement with an IN list.  Maybe I’ll go over that next.  Hopefully before Fall semester starts 🙂

Good Luck.

John

Posted in PeopleSoft, PS Query | Comments Off on PS Query – Decode Function

Drilling URL

Posted by jeggent on 9th May 2011

Cool New Tool: Drilling URL


In starting loan origination for 2011-2012, I wanted to know what status all of the loans were left in after running the process.  So I created a really quick query to just count the IDs by loan status for the aid year.  When I saw that some loans were in a “Hold” status I wanted to then get the listing of those IDs so that I could go and look at those accounts.  This reminded me of the drilling URL example from the Maximizing the use of PS Query for Financial Aid session from the Alliance 2011 conference.  After setting up the Drilling URL, I am able to just click on the loan status and see a listing of all the loans in that status.  There are lots of examples that I can think of that this technique would be useful for.  A department could show the count of students in their classes for a semester and click the class name to show a roster of students in the class.  I will now step you through setting up a query with a Drilling URL.

A drilling URL actually connects two different queries.  So the first step is to create what I will refer to as the detail query, the query with the specific listing that will be reached by clicking the link in the top level query.  In my example this is the BG_FA_LOAN_STATUS_DETAIL query.

For my detail query I am just going to output a few fields from the LOAN_ORIG_DTL record along with the student’s name.  The first important step is to create the Prompts in this query that will be part of the linking process from the top level query.  I want to list the details for all of the loans in a given status for a given aid year, so my two prompts will be for Aid_Year and LOAN_PROC_STAT.

Of course these prompts must be in the Criteria of the query in order to be used.

Next, save this query and begin a new query.  My top level query is called BG_FA_LOAN_STATUS.  It will display a count of records in each loan status by aid year (prompting for aid year).  You’ll see that I have a “Count” on A.EMPLID and I am displaying LOAN_PROC_STAT twice.  This is because I want to display the long translate of the field for the user (note the ‘L” in XLAT) but I also need the one character code to use in the prompt of the detail query.  To do this I just created an expression that is simply A.LOAN_PROC_STAT, displayed that expression and used the translate on the actual field.  The aid year is also displayed and will be used for the detail prompt.

Now you need to setup the Drilling URL.  In “Expressions”, click the Add Expression button and select “Drilling URL” from the Expression Type drop-down.  (the expression text will get filled in for you after completing the following steps).

There are different Drilling URLs that you can use, but we want a Query URL, so click the Query URL link.  You can now search for the detail query that you will be linking to.  It will bring in the prompts from that query (URL Keys) and you choose the fields from your query to populate those prompts.  You also choose (in Map URL to Query Columns) which value or values to turn into clickable links, I am only using the translate of the LOAN_PROC_STAT as the hyperlink, but any or all of the fields can be used to the same effect.

That’s it!  Now when you run this query the Status field will be a link that you can click to get the detailed listing.  Let me know if you try this and have any questions.  Enjoy!

Posted in Financial Aid, PeopleSoft, PS Query, Tools | 2 Comments »

Prior Aid Year

Posted by jeggent on 26th January 2011

Not that I’m ever the poster boy for reliable blog posting, but I’m probably not going to be posting much until award notification go out in mid-March.  I just wanted to give that warning so you don’t think the blog has been abandoned if there are a couple of weeks without an update.  I do have one little PS Query trick for you today though.  In creating a new Pop Select query for aid year activation I wanted to check for an award offer in the prior aid year.  Sure I could have just prompted for the prior aid year and used that, but I was already prompting for the new aid year and didn’t think both should have to be entered.  The solution was to use the following criteria in an “Exists” subquery:

Best of luck!

Posted in Financial Aid, PeopleSoft, PS Query | Comments Off on Prior Aid Year

Mass Assign/Release Service Indicators

Posted by jeggent on 15th December 2010

Now that my class has ended for the semester, I’m able to finally do some other things, like blog.  In the last post I said that my favorite new toy with PeopleSoft 9.0 is the 3C Engine with Pop Select.  If we did not have a customization for it under 8.9, a very close contender for favorite thing in 9.0 would be the mass assign and release of service indicators.  For us in Financial Aid, we use service indicators with many different processes including holding disbursement.  Below are the basic steps to setup and use mass assign and release of service indicators.

  1. Set up the Service Impact – Set Up SACR > Common Definitions > Service Indicators > Service Impact Table
    • The impact is what will be referenced in the other processes like disbursement.
  2. Set up the Service Indicator – Set Up SACR > Common Definitions > Service Indicators > Service Indicator Table
    • Here is where you will choose the service indicator code, the description (this is what the student will see in “Holds” in Self Service), if the indicator is Positive (if not checked it’s negative), if it should be displayed in self-service (if not checked it will not), the impact you’ve set up previously, and other default options.  You must also assign at least one reason code.
  3. Write the query that will be used to select the population to assign the service indicator to.
    • *IMPORTANT NOTE* If the query does not select any rows the process will insert a row into the SRVC_IND_DATA table with a blank EMPLID.  So to keep this from happening, on each of our assign queries I have a union that always and only selects an EMPLID that is not associated with a real person (an account we set up just for processing). If you are going to be running this on a schedule you will really want to consider this step.
    • Your query will need to include the bind record for this population select process which is SCC_BND_SRCIND.
    • I would recommend that your logic include a “does not exist” subquery to make sure that each record is not already assigned this service indicator for this term.
  4. Set up the run control – Campus Community > Service Indicators (Student) > Mass Assign
    • Selection Tool: PS Query
    • Select the query: If you do not see it on the list you probably did not include the correct bind record.
    • Previewing the selection results is probably wise the first time and set the query prompts (Edit Prompts link) if there are any.
    • Specify the service indicator code, Reason, Effective Period, Assignment Details, and Contact Information.
  5. Run the process.  We have several assign and remove processes running in a JobSet before disbursements each night.
  6. Set up Mass Release query and run control if appropriate (include a union for processing ID).

I know this was really high level, feel free to hit me up in the comments with any questions.

Good luck!

Posted in Financial Aid, PS Query, Tools | 2 Comments »

Auto-Checklists with 3C Engine

Posted by jeggent on 30th November 2010

My favorite new toy with PeopleSoft 9.0 is the 3C Engine with Pop Select.  We had been using a customization to assign communications with a query in 8.9 but did not have similar functionality with checklists until now.  Being able to assign checklists (and/or communications/comments) in batch based on a query is very useful functionality to have and pretty easy to setup and use.  Below are the steps to setup and use the 3C Engine.

  1. Setup the Checklist and Checklist Item (or Communication/Comment) – Set Up SACR > Common Definitions > Checklists > …
  2. Setup the Event Definition – Campus Community > 3C Engine > Set Up 3C Engine > Event Definition
    1. Bonus: You can specify a Responsible ID and Item status at this point.
  3. Assign a 3C Group to the Event – Campus Community > 3C Engine > Set Up 3C Engine > Event 3C Groups
  4. Write the query that will select the group you want to assign the Checklist (and/or communication/comment) to – Reporting Tools > Query > Query Manager
    1. Be sure to join in the Pop Select record for the Administrative Function associated with the event.  For me it is FINA and the record is “SCC_PS_FINA_BND”
    2. Please test your query and check the results!  You really don’t want to mass assign to the wrong population (although with Bundle 19 you can delete 3C’s now 🙂 ).  You’ll probably want to include a “Does Not Exist” subquery to keep the process from assigning the item(s) to the same group every time you run it.
  5. Setup the 3C Engine run control.
    1. Select “Population Selection”, specify Event Selection items including the Event ID we created, select PS Query as the Selection Tool, then select your query.  If your query doesn’t show up, you probably did not join in the correct Bind record.
  6. Enjoy!

Adding this process to your nightly schedule, especially before disbursements for Financial Aid, could be a very useful tool for your office.  Best of luck with 3C Engine!

Posted in Financial Aid, PS Query, Tools | Comments Off on Auto-Checklists with 3C Engine

PS Query LAG Function

Posted by jeggent on 4th November 2010

PeopleSoft Query Tip of the Week.

Disclaimer:  This may only work with Oracle databases

Did you know that you can use the LAG function in an expression to reference a field in a previous row?  It’s true!  I’ll give you a useful example of this functionality.

Expression Text

CASE WHEN LAG(A.EMPLID,1) OVER (ORDER BY A.EMPLID) = A.EMPLID THEN ‘N’
ELSE ‘Y’
END

In English: When this EMPLID is equal to the previous EMPLID then the result of this expression is ‘N’ (not unique), otherwise ‘Y’ (it is unique).

You can now use this expression as a field to display a ‘Y’ when the EMPLID changes or an ‘N’ when it is the same as the previous row.  Alternatively you could output a 1 or 0 (zero) which could then be summed to get a count of the unique IDs in the results.  This is useful for me when I am listing, for example, all of the awards a student has.  The query is returning multiple award lines per ID.  I can use this expression to get a unique count of students on the listing.

Another tool for your PS Query toolbox.  Enjoy.


Posted in PS Query | Comments Off on PS Query LAG Function