
What is more frustrating than not being able to download a video and not having the means to save it as well? You’re watching a great documentary and you want to show it to your friends later on, but there are no means of downloading it. Annoying right? If only there was a way to take snapshots of entire videos like that of pictures.
Well, now there is a way! The Wondershare DemoCreator makes video recording along with quality audio recording a dream come true. It is a must have video and audio recording software and will fit well in your collection. To help you set it up and get started, this article will walk you through all you need to know.
What is Screen Recording?
The meaning of Screen Recording is right there in its name. You can record whatever is visible on the screen of your mobile or PC. This includes recording videos and their audios with clarity as well. It records all the movements on your screen and tracks your clicks or touches on the screen.
It does not limit the view of the video by remaining fixed in one size. You can set the size as you please to ensure only the part you want to be recorded is within sight. This allows only window or full screen video captures.
All of these operations are possible with a software like Wondershare DemoCreator; it allows video capturing on your device along with distortion-free smooth audio. You can also control how you can record and edit videos that you capture.
How to Use Wondershare DemoCreator Screen Recorder
Screen Recorders are extremely beneficial and have facilities to accommodate many people, no matter what field. They can be used by gamers to record their victory as proof or to give entertainment during gaming contests. They can be used by university and college professors to share material with students or they can be used by an employee to give a PowerPoint Presentation.
The screen recorder on the DemoCreator has a ton of incredible easy-to-use features and tools that allow you to share your screen, record videos along with audios, and edit videos to customize them into your own tastes. The great thing is, it does not require a lot of effort either. You can simply create a video and edit it according to your likings for a low price and it will still come out looking great.
It is important to understand how to conduct operations with your screen recording software to ensure a high quality production. Here is how you can record your screen and audio with the DemoCreator:
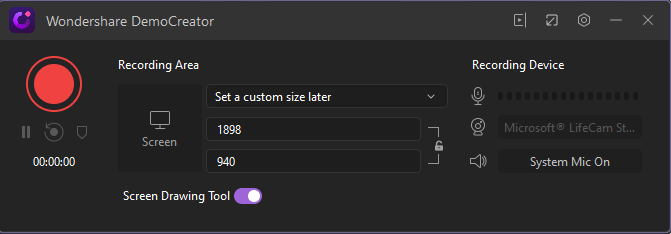
1. Once you launch the software, click on New Recording to initiate your screen recording.
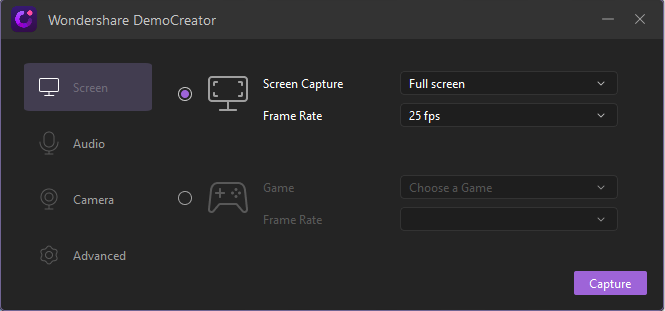
2. After this, the window will show you the size of the screen to be recorded. You can customize it manually or choose full screen by your choice.
3. By going into settings available on the top bar you can choose how you want the recording to be done. Set the screen rate.
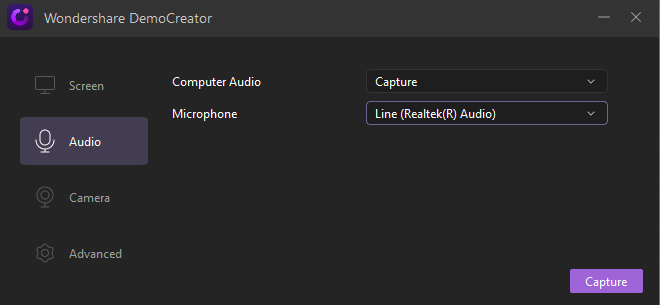
4. Set the microphone; whether you’ll be using the system mic or an external microphone.
5. Set the camera whether it is the in-built camera of the device or a web-cam.

You are all set for recording your screen. To make the experience more convenient, a few key points to remember is that the F10 key can be used to stop and start the recording whilst the F9 key can be used to pause and play.
How to Edit your Recorded Video
The features do not end here. You can edit and personalize your videos to make them more interactive. Here are some of the features that will make your video look more fun and innovative.
Captions
You can add themes, title, subtitles and more to your video. Different effects on your captions will give it a more captivating appeal.
Annotations
These are small text boxes which you can add in your video wherever you want to place them with text speeches written in them in case you want a more elaborate description in some places.
Stickers
The sticker features allows you to paste different stickers in the video as you please making it more colorful and interactive. You can also add emoji stickers, what better way to appeal to your audience?
Transitions
This effect allows you to make transitions between your slides or merged videos when changing with a more dramatic effect. It includes swirl, fade, morph, erase, etc.
Green Screen
You can now let the worry of your background go. With this green screen effect, you can change your background,whatever it may be, to the one you want. Giving a class to future astrophysicists? Make your background into space!
Cursor Effect
Want to bring the attention to a specific part of the video? No worries, this effect allows you to highlight your cursor and give it a ring or a click sound. You can customize your cursor to your needs now.
Crop
This is a basic editing tool which lets you crop out the irrelevant portion of your video and keep it concise to the important part.
Split
The split feature allows you to cut out a portion of your video thus dissecting it. The removed portion can be deleted altogether or can be adjusted to a different part of the video as you want.
How to Export your video
This software lets you export your video to whatever format you think best suits your requirement. You can export the video to MP4, MP3, MOV, WMV, AVI or GIF. After you have done editing your video, click Export.
A small window will open showing you all the information about the exportation of the file. You can customize the settings and export the video to the set format.
Conclusion
Using a screen recording software is fairly simple and provides you with a lot of benefits. So if you do not already have one, download the Wondershare DemoCreator for its incredible features and aids.